
Sia Astelle is a high value class to make. Has a best in slot legion piece for bossing and a best in slot link skill for most classes. Seems complicated but is actually pretty simple to play well once you understand how Sia’s playstyle works.
| Best in Slot | Main | Bossing Mule |
| BiS Weapon | Genesis Celestial Light | AbsoLab Celestial Light or Arcane Umbra Celestial Light |
| BiS Secondary | Princess No’s Compass | Princess No’s Compass |
| Class | Magician | |
| Shared Cash Shop | Sia Astelle | |
| Legion Effect | Increases % Abnormal Status Damage(+1/2/3/5/6%) | |
| Max Link Skill | Tree of Stars – Buff Duration +10% and Critical Damage +3% | |
| Primary Stat | INT | |
| Secondary Stat | LUK | |
| Inner Ability Top Line | +1 Attack Speed | +1 Attack Speed |
| Does it benefit from max Attack speed | Yes (can reach with Green Pot, Decent Speed Infusion, and IA) | |
| 2 min or 3 min burst type? | 2 min |
Sia does not use a shield, does not need cooldown skip, is gender locked to female, and likes a lot of buff duration.
Sia is kind of a combo class since she requires you to press skills in a certain order but becomes more of a spamming 2 buttons type of class once you reach 5th job.
This guide will include skill sequence, burst guide, node setup, and generally how to play the class.
How Sia Works and Playstyle

To play Sia Astelle you need to understand her Stellagram. It will show what (Marking) skills have been used and recorded in the Stellagram. If you click on Constellation Skills you’ll see what you need to use in order to activate certain skills. I’ll also go over which ones to do.
Sia’s basic playstyle is using Marking Skills to record on the Stellagram and triggering Constellation skills with bonus effects.
Sia has 2 different types of skills. They are Marking Skills and Constellation skills. Marking Skills will appear on the Stellagram and Constellation skills will not. They can both be used on their own. However, if you use the Marking Skills to activate Constellation skills you’ll get a Stellagram Fusion bonus. You’ll see in the skill description what the Stellagram Fusion bonus is.
As an example, in 1st job you’ll get Ray and Stellar I – Antares.
If you record 4 Ray skills on your Stellagram it will activate Stellar I – Antares with the bonus effect of Duration +8 secs.
If you just pressed Stellar I – Antares on its own, it would only last 6 seconds instead of 14 with the bonus
This might sound more complicated than it is. Trust me when I say once you start playing it will be very simple. ESPECIALLY when you get to 5th job and have the skill Shine. Once you have this skill maxed out you won’t have to worry about manually triggering Stellagram Fusions and it will automatically activate for your burst and mini bursts.
Sia Astelle Beginner Skills
Sia Astelle’s important beginner skills are Starry Wave and Stellar Equalize.
Starry Wave is an air stall skill that lets you glide slowly while going down. Just need to hold the jump key while in the air.
Stellar Equalize is a skill that increases the Attack and Magic Attack by 4% for all nearby characters for 40 mins. Cooldown of 5 mins. Great for bossing and mobbing for extra damage. (this classes hero’s echo skill)
Sia Astelle 1st Job Skill Build
- Ray (+1), Starry Flow (+1), Stellar I – Antares (+1), Starlight (+1), Starry Leap (+1)
- Starry Flow (MAX)
- Astral Movement (MAX)
- Ray (MAX)
- Starlight (MAX)
- Stellar I – Antares (MAX)
- Starry Leap (MAX)
- Astral Magic Guard (MAX)
Sia Astelle 1st Job Skill Explanation
From levels 1-30 you should have no problems killing mobs so focus on leveling your mobility skills to reach mobs faster.
Sia’s notable 1st job skills are Ray, Stellar I – Antares and Starlight.
Ray is your main mobbing and bossing skill. You’ll get another skill in 2nd job which you can also use to mob but for the most part you can just spam Ray.
Stellar I – Antares is a Constellation skill that will activate automatically if you use Ray 4 times. You can also use the skill on its own without having to use Ray 4 times. If you activate the skill through using the 4 Rays
| Skill Name | Max Lvl Description | Purpose |
Ray | Marking Skill MP Cost: 24, Max Enemies Hit: 4, Damage: 90%, Number of Attacks: 4, Records Ray on the Stellagram | Mobbing Skill and Main Bossing Skill |
Stellar I – Antares | Constellation Skill MP Cost: 32, Summons a rabbit hole that periodically deals 160% collision damage 3 times to up to 6 enemies for 6 sec Max Summons: 4 Rabbit holes recharge every 10 sec, and you can have up to 4 [Stellagram Fusion] Rabbit Hole Duration: +8 sec | Constellation Skill that mainly helps with bossing and a little mobbing |
Starlight | Upon attacking or activating a Constellation Skill, deals 90% damage 2 times and releases a traveling ray of starlight up to 3 times The ray of starlight attacks until it disappears or reaches the max number of attacks When the starlight disappears, it attacks an enemy that was previously attacked an additional 1 times | Toggle Skill (make sure to always toggle this on when you log in) |
Starry Flow | MP Cost: 20, Teleport Horizontal Range: 190, Teleport Vertical Range: 275 | Teleport Skill (main source of movement) |
Starry Leap | MP Cost: 25, Allows you to jump a greater distance | Up Jump Skill (press Jump + Up Arrow Key together while in the air) |
Astral Magic Guard | Damage Taken: -20 %, 85% of damage taken goes to MP instead, Defense: +100 | Passive Skill (You lose % MP instead of HP) |
Astral Movement | Magic ATT: +20, Speed: +22, Max Speed: +20, Jump: +20 | Passive Skill |
Sia Astelle 2nd Job Skill Build
- Boom (+1), Stellar II – Algol (+1), Astral Force (+1), Oort Wave (+1)
- Boom (MAX)
- Stellar II – Algol (MAX)
- Astral Force (MAX)
- Starlight Enhancement I (MAX)
- Oort Wave (MAX)
- Celestial Alignment (MAX)
- Astral Energy (MAX)
Sia Astelle 2nd Job Skill Explanation
Sia’s notable 2nd job skills are Boom, Stellar II – Algol, and Celestial Alignment.
Boom is a good skill to use for mobbing but its main purpose is to summon Algol which is a big help for mobbing and bossing.
Stellar II – Algol is a Constellation skill that summons Algol the lizard and Algol will dash and deal damage to enemies on its own. If you use Boom to summon Algol, you can have this up 100% of the time.
Celestial Alignment is an active buff that gives you Critical Damage for a duration. Because it has no cooldown you can have this active 100% of the time. Put it on a pet with Auto Buff to save keyboard space and never think about it again.
It is up to you and the map layout of which skill to use while mobbing. For bossing you want to spam Ray and use Boom to summon Algol whenever you can.
| Skill Name | Max Lvl Description | Purpose |
Boom | Marking Skill MP Cost: 30, Max Enemies Hit: 6, Damage: 230%, Number of Attacks: 3, Records Boom on the Stellagram | Secondary Mobbing Skill |
Stellar II – Algol | Constellation Skill MP Cost: 46, Summons Algol as a lizard that deals 210% damage to up to 8 enemies 4 times for 12 sec [Stellagram Fusion] Lizard Duration: +18 sec Cooldown: 20 sec | Constellation Skill useful for mobbing and bossing |
Celestial Alignment | MP Cost: 40, Duration: 80 sec., Critical Damage: +10% | Active Buff |
Oort Wave | INT: +20, Damage: +15%, Attack Speed: +1 | Passive Buff |
Starlight Enhancement I | Starlight Damage: +100% points | Passive Buff to Toggle |
Astral Force | Magic Mastery: +50%, Magic ATT: +30, INT: +20, Attack Speed: +2 | Passive Buff |
Astral Energy | Max MP: +30% MP Absorb Chance: 30%, Amount Absorbed: 5% of Max MP, Amount Absorbed: 3% of the boss’s Max MP | Passive Skill |
Sia Astelle 3rd Job Skill Build
- Pole (+1), Stellar Enhancement I (+1), Stellar V – Fomalhaut (+1)
- Astral Elements (MAX)
- Stellar Enhancement I (MAX)
- Starlight Enhancement II (MAX)
- Pole (MAX)
- Stellar V – Fomalhaut (MAX)
- Stellar IV – Bellatrix (MAX)
- Stellar III – Alchiba (MAX)
- Astral Invincibility (MAX)
Sia Astelle 3rd Job Skill Build Explanation
Sia’s notable 3rd job skills are Pole, Stellar III – Alchiba, Stellar IV – Bellatrix, Stella V – Fomalhaut, and Starry Boost.
Pole is a skill mainly used in bossing. It has a very low cooldown (5 seconds) and it does a lot of damage so you want to be using it as soon as it’s off cooldown.
Stellar III – Alchiba is a buff skill that is part of your main and mini burst. It can go into your skill sequence so you don’t have to worry too much about it. Also don’t worry about activating its Fusion bonus since you will have the Shine skill once you actually start bossing.
Right click and Lock this skill in the skill tab so that it does not trigger when you don’t want it to. It is very easy to trigger since all it needs is 1 Pole to activate. I really suggest you do this so that your bossing setup does not get messed up. For mobbing you can unlock it.
Stellar IV – Bellatrix is a buff skill that is part of your main and mini burst. It can go into your skill sequence so you don’t have to worry too much about it. Also don’t worry about activating its Fusion bonus since you will have the Shine skill once you actually start bossing.
Stellar V – Fomalhaut is a short cooldown (30 seconds) attacking skill that once activated will send out conches that deal damage to your enemies. Mainly used for bossing and can be used off cooldown whenever it is up. If you can line it up with your mini and big burst that would be good as well.
Starry Boost is a toggle skill that increases the distance of your Teleport. Sometimes it could be useful to turn this off but honestly I would not and just have it Toggled On at all times.
| Skill Name | Max Lvl Description | Purpose |
Pole | Marking Skill MP Cost: 50, Summons starlight that deals 520% damage to up to 5 enemies 3 times for 3 sec, Records Pole on the Stellagram Cooldown: 5 sec | Secondary Bossing Skill (low cooldown skill you need to use whenever up for max damage in bosses) |
Stellar III – Alchiba | Constellation Skill MP Cost: 46, Duration: 30 sec., Ignore Defense: +30% [Stellagram Fusion] Magic ATT: +30 Cooldown: 60 sec | Active Buff Skill (part of your mini and big burst setup) (make sure to lock this skill while bossing) |
Stellar IV – Bellatrix | Constellation Skill MP Cost: 90, Duration: 30 sec, Damage: +10%, Activates Starlight Link at set intervals [Stellagram Fusion] Number of Starlight Link attacks: +1 Cooldown: 60 sec | Active Buff Skill (part of your mini and big burst setup) |
Stellar V – Fomalhaut | Constellation Skill MP Cost: 90, Duration: 12, Max Enemies Hit: 8, Damage: 410%, Number of Attacks: 4, Horned Conches Created: 4 [Stellagram Fusion] Upon attacking, summons 4 Horned Conches that automatically pursue and attack nearby enemies Conches deal 410% damage 2 times until the max number of attacks is reached or they disappear Attacks up to 2 times, then disappears in 10 sec Cooldown: 30 sec | Active Skill for Mini Bursts (can also help while mobbing but not necessary) |
Starry Boost | MP Cost: 20, Horizontal Teleport Distance: +65, Vertical: +25 | Toggle Skill (make sure to always toggle this on when you log in for extra distance on TP) |
Stellar Enhancement I | Final Damage: +25% Ray – Enemies Hit: +1, Number of Attacks: +2, Damage: +200% points Boom – Enemies Hit: +2, Number of Attacks: +1, Damage: +150% points Stellar I – Antares Damage: +250% points Stellar II – Algol Damage: +250% points | Passive Buff |
Starlight Enhancement II | Starlight Damage: +200% points | Passive Buff |
Astral Elements | Magic ATT: +10%, Critical Rate: +10%, Critical Damage: +10% | Passive Buff |
Astral Invincibility | Knockback Resistance: +40%, Status Resistance: +30, Elemental Resistance: +30% | Passive Buff |
Sia Astelle 4th Job Skill Build
- Stellar VI – Izar (+1), Stellar VII – Vega (+1), Link (+1)
- Astral Assimilation (MAX)
- Astral Infinity (MAX)
- Stellar Enhancement II (MAX)
- Starlight Enhancement (MAX)
- Empowered Ray (MAX)
- Enhanced Boom (MAX)
- Maple Warrior (MAX)
- Stellar VI – Izar (MAX)
- Stellar VII – Vega (MAX)
- Appear (MAX)
- Link (MAX)
- Stellar VIII – Sadalmelik (MAX)
- Pulse (MAX)
Sia Astelle 4th Job Skill Explanation
Sia’s notable 4th job skills are Link, Stellar VI – Izar, Stellar VII – Vega, Stellar VIII – Sadalmelik, Appear, and Pulse.
Link is a low cooldown (10 sec) HP recovery skill. Useful in boss fights and also used in order to activate certain Constellation skills.
Stellar VI – Izar is an attacking skill that you should use off cooldown whenever it is up. It is better to just activate this whenever you can instead of waiting for your burst to use it.
Stellar VII – Vega is another low cooldown attacking skill that you should use off cooldown. Has a better chance of lining up with your mini and big burst setup so you can wait a few seconds if needed to activate with your bursts.
Stellar VIII – Sadalmelik is an I-Frame skill which makes you invincible for 2 seconds. It can be extended up to 3 seconds if you use the Stellagram and trigger the Fusion bonus but I would not suggest going out of your way to do that. 2 seconds should be more than enough.
Appear is a big buff skill that will give you a ton of extra damage for a short duration. Part of your big burst setup. It can be placed in the skill sequence which you’ll see below.
Pulse is a cleanse skill that gets rid of all abnormal status conditions for a few seconds. Might not seem that important but can be really good in bosses like Black Mage and Seren.
| Skill Name | Max Lvl Description | Purpose |
Link | Marking Skill MP Cost: 40, Restores 10% of Max HP, Records Link on the Stellagram Cooldown: 10 sec | HP Recovery Skill (also used to activate Constellation skills) |
Stellar VI – Izar | Constellation Skill MP Cost: 100, Blade Created: 3 Each blade deals 470% damage 3 times and disappear when they reach their maximum attack count Attacks up to 8 times, then disappears [Stellagram Fusion] +2 blade(s) Cooldown: 40 sec | Mini Burst Skill (low cooldown big attack skill) |
Stellar VII – Vega | Constellation Skill MP Cost: 100, Unleashes a Starlit Gust that deals 700% damage to up to 15 enemies 10 times Also grants the Starlight Wings buff, which deals 700% damage to up to 5 enemies 3 times at set intervals for 8 sec [Stellagram Fusion] Starlight Wings Buff Duration: +6 sec Cooldown: 30 sec | Mini Burst Skill (low cooldown big attack skill) |
Stellar VIII – Sadalmelik | Constellation Skill MP Cost: 40, Invincible for 2 sec. after casting Damage taken is reduced by 20% for 12 sec., including damage proportional to max HP [Stellagram Fusion] Invincibility Duration: +1 sec Cooldown: 90 sec | I-Frame Skill (lets you be invincible for 2-3 seconds) |
Appear | MP Cost: 120, Duration: 10 sec., Final Damage: +10% Cooldown: 120 sec | Active Buff (Big Buff part of your Big 2min burst setup) |
Maple Warrior | MP Cost: 70, Goddess of Maple World appears [Passive Effect: All stats with a direct AP investment increase by 15%] | Passive Buff for stats |
Pulse | MP Cost: 30, Cooldown: 300 sec | Active Skill that clears status effects |
Empowered Ray | MP Cost: 24, Max Enemies Hit: 4, Damage: 90%, Number of Attacks: 4, Records Ray on the Stellagram | Passive Buff |
Enhanced Boom | MP Cost: 30, Max Enemies Hit: 6, Damage: 230%, Number of Attacks: 3, Records Boom on the Stellagram | Passive Buff |
Stellar Enhancement II | Final Damage: +35% Ray – Enemies Hit: +1, Number of Attacks: +2, Damage: +70% points Boom – Enemies Hit: +2, Number of Attacks: +1, Damage: +30% points Pole – Enemies Hit: +1, Number of Attacks: +1, Damage: +100% points Stellar I – Antares Damage: +470% points Stellar II – Algol Damage: +420% points Stellar III – Fomalhaut Damage: +370% points | Passive Buff |
Starlight Enhancement III | Starlight Damage: +300% points | Passive Buff |
Astral Assimilation | Magic Mastery: +70%, Magic ATT: +50, Critical Rate: +20%, Critical Damage: +10% | Passive Buff |
Astral Infinity | Permanently Gain Damage: +30%, Boss Damage: +20%, Knockback Resistance: +60% | Passive Buff |
Sia Astelle Hyper Skill Build
This build is optimal for both mains and boss mules.
Passive Skills
Marking – Reinforce
Marking – Extra Strike
Marking – Persist
Appear – Enhance
Appear – Persist
Active Skills
Stellar IX – Canopus
Stellar X – Capella
Observe
Stellar IX – Canopus is a summon skill that is part of your mini and big burst setup. (60 sec)
Stellar X – Capella is a big buff skill used for both mini and big bursts. (60 sec)
Observe is a big buff skill mainly used for your big burst. (2min)
Sia Astelle 5th Job Skills
When you reach level 200 you’ll get access to your V Matrix and new 5th job skills. The best way to level them up is through Nodestones and Experience nodes. Sia Astelle V Skills are in order of importance are, Shine, Stellar XII – Sadalsuud, Stellar XI – Sirius, Savior’s Circle.
Sia Astelle 5th Job Skill Explanation
Shine is one of your most important 5th job skills. This skill will make it so that your mini and big bursts become super easy to pull off. What the skill does is, once activated, any Constellation skills you use will also have their Fusion bonus activated as well.
This means during burst you don’t need to set up your Stellagram, you just need to activate Shine and press all of the Constellation skills right away and you’ll be doing maximum damage.
When you max out the skill (level 30) it has a 60 second cooldown which means it will be perfect for your mini and big burst.
Stellar XI – Sirius is a big summon skill that is mainly used for bossing. Since it has a 60 sec cooldown, it can be used for your mini and big burst.
Stellar XII – Sadalsuud is a summon skill that gets stronger as you use more Constellation skills. Once you activate it you have 20 seconds to use all your Constellation skills and then you can either activate the skill again to deal huge damage or just wait the timer to deal huge damage.
Time Binder is your bind skill. Mainly used in bossing situations when setting up for a big burst. You won’t see this skill in your V Matrix and its level is connected to Stellar XII – Sadalsuud.
Once you equip Sadalsuud you can find Time Binder in your skill window.
Savior’s Circle is a buff skill that will increase your Boss Damage and upgrade some of your Stellar skills. 2 min cooldown so it is part of your big burst setup.
| Skill Name | Max Lvl Description | Purpose |
Shine | Marking Skill MP Cost: 400, Stellagram Fusion effects will always activate upon completing a Constellation Skill for 25 sec, Records Shine on the Stellagram Cooldown: 60 sec | Active Buff Skill (very important for mini and big burst) |
Stellar XI – Sirius | Constellation Skill MP Cost: 600, Summons Sirius as a wolf that deals 870% damage to up to 15 enemies 10 times for 12 sec The wolf will howl before he disappears, increasing Ignore Defense by 10% for 10 sec [Stellagram Fusion] Grants the Howl buff while the wolf is active Cooldown: 60 sec | Summon Skill (mainly used in bossing for mini and big burst) |
Stellar XII – Sadalsuud | Constellation Skill MP Cost: 600, After 20 sec or when used again after summoning, Max Enemies Hit: 9, Damage: 1130%, Number of Attacks: 15, Explosions: 10 The hourglass can be enhanced by attacking the enemy with a constellation skill, increasing Final Damage by 100% [Stellagram Fusion] Explosion Count: +4 Cooldown: 120 sec | Summon Skill (mainly used in bossing for your big burst setup) (Can press the skill again to trigger early) |
Time Binder | MP Cost: 65, Max Enemies Hit: 9, Stun Duration for Attacked Enemies: 13 sec Stun Duration: +100%, depending on damage inflicted with Time Binder Cooldown: 120 sec | Bind Skill (levels alongside Stellar XII – Sadalsuud) |
Savior’s Circle | MP Cost: 450, Duration: 30 sec Boss Damage: +20% Stellar I – Antares Hits: +3 Stellar II – Algol Hits: +2 Stellar XI – Sirius Hits: +1 Cooldown: 120 sec | Active Buff Skill (mainly used for bossing big burst setup) |
Sia Astelle Perfect Trio Nodes
In the V Matrix you’ll also have Boost Nodes. They are there to level up your 1st – 4th job skills past their initial cap. You’ll want to level up the most useful skills for your class and those will form your perfect trios.
For Sia Astelle you’ll want to boost all of her skills and this is what that would look like,
| Trio # 1 Set | Trio # 2 Set | Trio # 3 Set | Trio # 4 |
Ray / Boom | Starlight / Stellar I – Antares | Stellar VI – Izar / Stellar IX – Canopus Boost | Stellar IX – Canopus Boost |
Boom / Pole | Stellar I – Antares / Stellar II – Algol | Stellar VII – Vega / Stellar VI – Izar | Starlight |
Pole / Ray | Stellar II – Algol / Stellar V – Fomalhaut | Stellar V – Fomalhaut / Stellar VII – Vega | Anything |
Trio # 1 set means you make 1 boost node with Ray, Boom, Pole and another boost node with Boom, Pole, Ray (in that order). Then both of them together make a set.
If you’re making a boss mule I would still try to boost all of her skills since it is much easier nowadays to get nodes and make the perfect ones.
An explanation of perfect trios and full list of all classes and their perfect trio nodes here.
All Useful 5th Job Skills for Sia Astelle
These are all the skills you’ll need to get the most out of Sia Astelle. Any other skills are not useful and can be disassembled.
Do not level up your Decent skills past level 1 unless you’re at the end game and min/maxing to get an extra 5 stat at max level. At level 1 all your decent skills have 100% uptime since the duration will be longer than the cooldown. Holy Symbol is the only exception since you’ll get more exp and drop rate as you level it.
Decent Sharp Eyes |
Decent Combat Orders |
Decent Speed Infusion |
Maple World Goddess’s Blessing |
Mana Overload |
Erda Nova |
Decent Holy Symbol |
Ethereal Form |
Blink |
Decent Advanced Blessing |
Will Of Erda |
Erda Shower |
Decent Holy Fountain |
Rope Lift |
True Arachnid Reflection (Obtained from Will boss) |
Solar Crest (Obtained from Seren boss) |
The ones that are underlined and bolded are not necessary if making a boss mule.
Sia Astelle 5th Job V Matrix Node Slot Priority
This is the order of what skills you should equip first,
- Boost Nodes, (Decent Holy Symbol + Erda Fountain for training), Shine
- Stellar XII – Sadalsuud, Decent Sharp Eyes, Decent, Speed Infusion
- Stellar XI – Sirius, Savior’s Circle, Decent Combat Orders
- Maple World Goddess’s Blessing, Mana Overload
- Everything Else (Blink, Rope Lift, Ethereal Form)
Maxing the skills in this order (except decents) is also ideal for bossing but if you want to get better training rates I would suggest putting more focus on Boost Nodes, Decent Holy Symbol, and Erda Shower.
Sia Astelle Skill Sequence
This is Sia’s Skill Sequence. Will update if anything changes. Also be aware that culvert usually has different timings to maximize score so these sequences won’t be ideal for that. For bossing this will be fine.
Also, the skills are ordered from longest duration to shortest and since some skills have the same duration length you might see other people run something that looks a little different, but it is essentially the same thing. Just make sure Appear, Terms and Condition, and Ring Activation are last.

2 min Buff Sequence
- Observe
- Maple World Goddess’s Blessing
- Stellar IV – Bellatrix
- Stellar III – Alchiba
- Savior’s Circle
- Stellar X – Capella
- Appear
- Terms and Condition (AB Link)
- Ring Activation (Ror4) (or WJ4 if Ring Swapping)

60 sec Buff Sequence
- Stellar IV – Bellatrix
- Stellar III – Alchiba
- Stellar X – Capella
- Terms and Condition (AB Link)
Note that the Oz ring slot should be Ring Activation so that whatever ring you equip it will trigger that one. Also if you don’t have an Oz ring just skip it till you do.
In the future the Oz rings will change so that they all have a 2 min cooldown instead of 3 min so you won’t have to ring swap anymore and just stick to Ror4.
With Skill Sequence you can free up a lot of keyboard space but I would still include skills like Terms and Condition (AB Link) on its own key so that you can check its cooldown and how long you have until it’s up.
Sia Astelle Bossing Combo
Sia is a 2 minute burst class with a 60 sec mini burst combo. So you’ll be bursting often on this class.
Make sure to have your toggles on(Starlight, Mana Overload, Starry Boost). Also, having your decent skills (sharp eyes, speed infusion, combat orders) on Pet Auto Buff or at least on before you begin your burst combo.
Also Stellar II – Algol has 100% uptime if you use Boom so make sure that is always up throughout the whole fight.
Sia Astelle 2 min Burst Combo
> Skill Sequence (2min) >
> (
+
+
+
+
+
) > (Spam
+
)
- Shine
- 2 min Skill Sequence (shown above)
- Time Binder
- Stellar IX – Canopus
- Stellar XI – Sirius
- Stellar VI – Izar
- Stellar VII – Vega
- Stellar V – Fomalhaut
- Stellar I – Antares
Spam Ray and Pole off cooldown. You want to press all the Stellar skills as quickly as possible after Time Binder.
This is your big burst setup. If you have Origin you use it right before you use your Ring Activation. Then wait for 10 seconds until it is unbound and then use Time Binder.
Sia Astelle 60 sec Burst Combo
> Skill Sequence (60sec) > (
+
+
+
+
)
- Shine
- 60 sec Skill Sequence (shown above)
- Stellar IX – Canopus
- Stellar XI – Sirius
- Stellar VI – Izar
- Stellar VII – Vega
- Stellar V – Fomalhaut
Don’t worry if Izar is not off cooldown, you want to be using that skill whenever it is up. It is a very minimal increase when used in the burst rotation.
Sia Astelle Off Burst
Sia’s off burst is just spamming Ray and using Pole whenever it is off cooldown. (which is often) Then using Boom x4 every so often to keep up Stellar II – Algol.
As you can see from Sia’s burst combos it is very simple and easy to do.
Sia Astelle 6th Job HEXA Skills
The HEXA matrix is split up into Skill Node (6th job Origin skill), Mastery Node (enhances 4th job skills), Boost Node (5th job enhancement), and Common Node (Job specific skills)
You’ll get your 1st Origin skill for free once you finish the quest line and the rest you’ll have to unlock yourself. Link to a Guide for HEXA Matrix so that you’ll have the best start possible.
| Node Type | Skill Name | Max Lvl Description | Purpose |
| Skill Node | Celestial Design | MP Cost: 1500, Invincible during casting Max Enemies Hit: 15, Damage: 840%, Number of Attacks: 8, Starlight Explosion: 50 Afterwards, Damage: 1340%, Number of Attacks: 12, Starlight Explosion: 40 Cooldown: 360 sec | Big Bind and Burst Skill (This is your Origin skill which binds the boss and gives a big buff to your skills for a duration) (This bind is different than a regular bind (erda nova) which means you can use your regular bind right after your Origin bind) |
| Mastery Node | SHINE Ray | MP Cost: 57, Max Enemies Hit: 5, Damage: 480%, Number of Attacks: 4, Records Ray on the Stellagram | Passive Boost to Your Main Bossing Skill |
| Mastery Node | SHINE Stellar I – Antares | MP Cost: 64, Summons a rabbit hole that periodically deals 550% collision damage 4 times to up to 6 enemies for 5 sec Max Summons: 4 Rabbit holes recharge every 10 sec., and you can have up to 4 [Stellagram Fusion] Rabbit Hole Duration: +5 sec | Passive Boost to Skill |
| Boost Node | Shine | Shine Duration: +15 sec | Passive Damage Boost to Skill |
| Boost Node | Stellar XI – Sirius | Stellar XI – Sirius Final Damage: +60% | Passive Damage Boost to Skill |
| Boost Node | Stellar XII – Sadalsuud | Stellar XII – Sadalsuud Final Damage: +60% | Passive Damage Boost to Skill |
| Boost Node | Savior’s Circle | Savior’s Circle Boss Damage: +40% | Passive Damage Boost to Skill |
| Common Node | Sol Janus | HP Cost: 500, Select a form of Sol Janus Cooldown: 3 sec [Passive Effect: EXP Obtained: +100%] | Only For Mobbing and Training (has 2 forms one is a summon and the other is a passive. Both kill mobs and the choice is dependant on what class you play) |
Sia 6th Job Erda Link
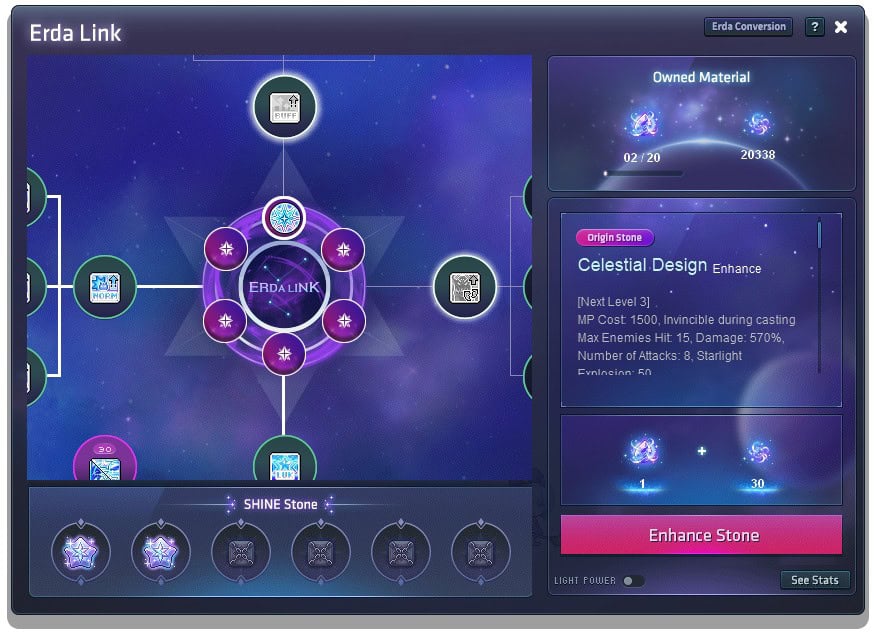
Sia’s 6th job looks different from other classes and has more options as to ways to upgrade. You’ll have to unlock the beginning stones which give you a benefit and also opens up other stones. You can look down the lines to see what you want to get. The top left section will give you access to Sol Janus and other good buffs for training.
Instead of nodes, Erda Link calls them Stones. Origin Stone = Skill Node, Ultimate Stone = Mastery Node, Skill Stone = Boost Node + Common Node, SHINE Stone = Hexa Stat. The other Stones, Boost + Rush, are bonus stats and effects when specific conditions are met.
Enhancing stones requires Sol Erda and Sol Erda Fragments like how the other system works but with this new branch system you can activate stones that just give stuff like EXP, INT, and Buff Duration instead of upgrading a skill.
6th Job Sia Astelle HEXA Skill Priority
For Sia it is hard to say which way to go is most optimal right now since it is a very new class. If this is going to be your main you’ll unlock everything anyways so just go with what you feel is right and just know there is no way you can brick your account.
Once more information is out there and I test things as well, I’ll update with the new findings.