Bea & Sirfetch’d enter the battlefield as a powerful Striker sync pair with the strongest possible sync move among Fighting-types. They’re best suited as your primary Striker and sync-move user with ample sync move nodes. While powerful physically, Sirfetch’d’s defenses are lacking. His Speed isn’t the greatest, especially with his only attacking move costing four bars on the move gauge. SS Blue & Blastoise are fantastically suited for Sirfetch’d, able to raise Attack, Defense, Sp. Def, and critical-hit rate. Plus, they will accelerate the move gauge with Blue’s Trainer move. Otherwise, Hilbert & Samurott or Skyla & Swanna are great allies to support Sirfetch’d.
The best Bea and Sirfetch’d sync grid builds are Sync level 2 and Sync Level 3 (MPR & Sharp Entry)
Universal Upgrades
HP +20
Attack +10
Defense +5
Sp. Def +5
Speed +5
Meteor Assault Power +8
Worthy Foe Meteor Assault Power +25
Universal Recommended Lucky Skill:
Critical Strike 2
Each build picks up +8 power to Meteor Assault and +25 power to Worthy Foe Meteor Assault, but otherwise most tiles are unique to their builds. Of course, since Sirfetch’d gains +2 critical-hit rate on entry, the only lucky skill you should consider on him is Critical Strike 2, which is a flat 20% boost on damage on any critical hit.
Sync Grid Builds
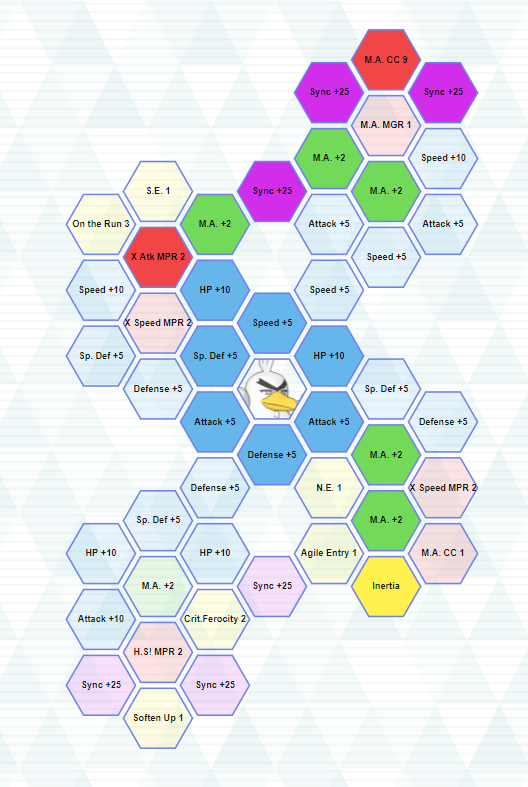
Sync Level 2
Total Sync Orb Cost: 750
Total Energy Used: 60

Unique Upgrades:
Attack +20
Defense +5
Sp. Def +5
Speed +10
Meteor Assault Power +4
Meteor Assault Move Gauge Refresh 1
X Attack MP Refresh 2
Worthy Foe Meteor Assault Power +25
Sadly, some of the best passive skills on the grid are unavailable, but it gives you room to pick up all Meteor Assault power tiles for a total +12 power. While it will only activate 20% of the time, Meteor Assault Move Gauge Refresh 1 can help the 4-bar move be a bit less costly by returning a bar to the move gauge after a successful attack. Worthy Foe Meteor Assault picks up all available sync tiles for a total of +50 power. X Attack MP Refresh 2 will help max out his own Attack with a 30% chance of returning one point after the move is used.
Sync Level 3 (MPR & Sharp Entry Variations)
Total Sync Orb Cost: 738
Total Energy Used: 59
Shared Unique Upgrades:
Meteor Assault Critical Charge 9
Worthy Foe Meteor Assault Power +50
Inertia
MPR Variation:
Meteor Assault Power +2
X Atk MP Refresh 2
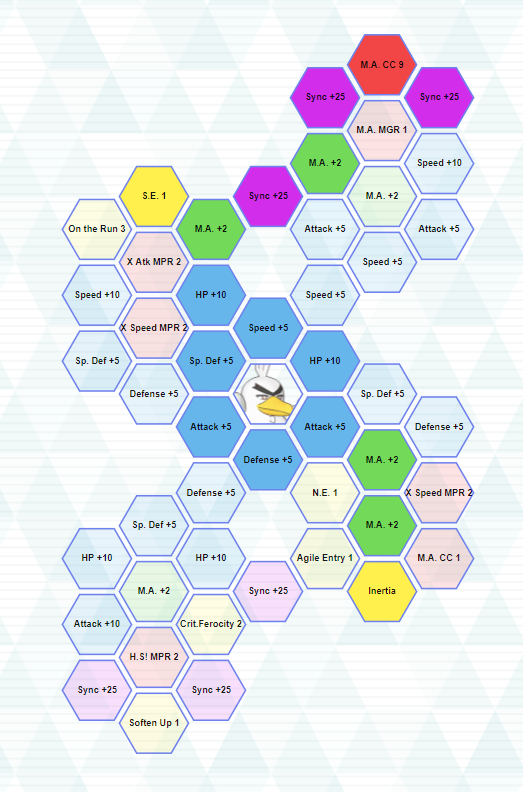
Sharp Entry Variation:
Sharp Entry 1
At sync level 3, Sirfetch’d narrows his build down to several key tiles with very little variation. Worthy Foe Meteor Assault gains a total of +75 power but its damage can be further boosted by Inertia. It scales the sync move’s damage based on how many stages Sirfetch’d’s Speed has been raised. With ample choices of allies to boost Speed, Sirfetch’d may not need to use X Speed at all. Meteor Assault Critical Charge 9 guarantees that one bar will be returned to the move gauge after a successful critical hit, making this 4-bar move effectively only cost three.
Sirfetch’d can be very self-sufficient in the MPR variation by picking up X Attack MP Refresh 2. Each use will have a 30% chance of having one point returned, meaning you only need one in order to max Attack. You’ll want allies that can raise his critical-hit rate by +1 to max it out and to boost his Speed as much as possible for the best effect on Inertia. Meteor Assault gains a total of +10 power.
Finding an ally to raise Attack and Speed is much easier than needing an ally to raise Sirfetch’d critical-hit rate to +3. In this Sharp Entry variation, Sharp Entry 1 stacks with his passive Sharp Entry 2 to max out his critical-hit rate when he enters the battlefield.