
Morty & Drifblim are a pair best suited for co-op, so these sync grid builds focus on where they will have the most impact. This time there is a section of universal upgrades that appear in all of the builds and each build below lists out its unique upgrades to help Morty & Drifblim.
The best Morty & Drifblim sync grid build would be to go for: Phantom Force Power, Phantom Force MP Refresh, and Pierce the Veil! MP Refresh.
Sync Grid Builds
Conditioned Power (3/5) focuses on Drifblim’s benefits when affected by a status condition, Sync Survival (3/5) packs a mighty punch with the pair’s sync move, and Pass it On (3/5) is useful if you want to use the passive ability Benefactor to the best extent, with a little bit of damage too. At the end is an alternative build to Pass it On where Drifblim does not attack at all.
Universal Upgrades:
- HP +10
- Attack +5
- Defense +5
- Sp. Atk +10
- Sp. Def +5
- Speed +10
- Phantom Force Power +4
- Phantom Force MP Refresh 3
- Phantom Force MP Refresh 3
- Pierce the Veil! MP Refresh 3
Phantom Force is the main move of these builds since it uses Drifblim’s higher Attack stat and is incredibly powerful. However, it does have a limited number of times it can be used. Picking up both Phantom Force MP Refresh 3 tiles give you a better chance to gain one or possibly two extra uses.
Pierce the Veil! is the base of Drifblim’s stat improvements. Picking up Pierce the Veil! MP Refresh 3 can potentially allow you to max Drifblim’s Attack or it can be saved for passing stats on to the third teammate.
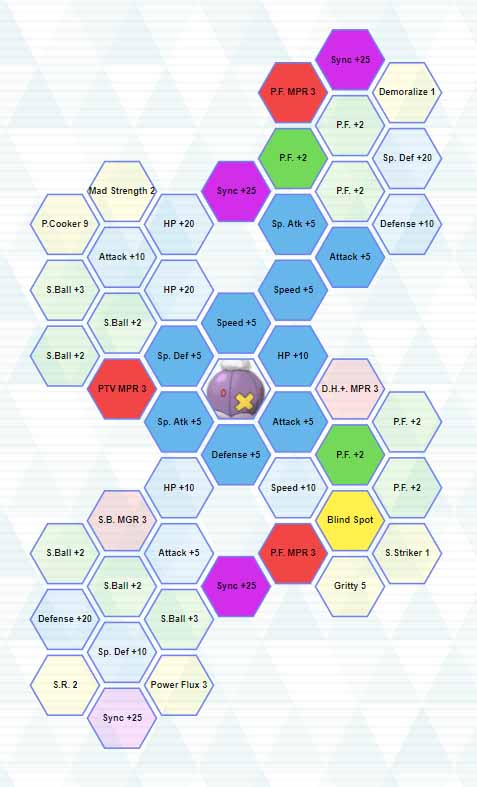
Conditioned Power Build (Sync Level 3/5)

Total Sync Orb Cost: 738
Total Energy Used: 59
Unique Upgrades:
- HP +10
- Shadow Ball Move Gauge Refresh 3
- Blind Spot
- Gritty 5
Lucky Skill: Gritty 3 or Critical Strike 2 or Enlightenment 9
This build is for when you know the opposing team will attempt to cause a status condition and Drifblim capitalizes on that. The goal is to deal out the damage before fainting and passing any stat boosts along.
The only move remaining after you’ve used up all Phantom Force attacks is Shadow Ball. Picking up Shadow Ball Move Gauge Refresh 3 will help to refill the move gauge for the expensive 3-bar cost Shadow Ball.
Since you’re aiming to be inflicted with a status condition, waiting until after to use Pierce the Veil! will grant you the best stat improvements. With one Pierce the Veil! MP Refresh, evasion could be maxed with three uses. Blind Spot will power up Drifblim’s sync move with each positive step of evasion.
Gritty 5 will power up Drifblim’s moves once he is affected by a status condition. If the chances of getting a status condition is extremely high in a battle, setting your lucky skill to Gritty 3 will produce better results than Critical Strike 2, but Critical Strike 2 is guaranteed to activate once Drifblim’s critical-hit rate reaches three and also affects sync moves. If you wish to reduce damage you take from being poisoned, badly poisoned or burned, Enlightenment 9 is a good choice.
Sync Survival Build (Sync Level 3/5)
Total Sync Orb Cost: 750
Total Energy Used: 60
Unique Upgrades:
- Attack +5
- Mystic Seer Phantom Force Power +75
- Blind Spot
Lucky Skill: Critical Strike 2
This build is if you’d like to use Drifblim’s sync move or if you’re trying to use Morty & Drifblim in singleplayer and don’t anticipate any status condition affecting Drifblim.
Only being able to reach three of the sync move’s tiles, it still improves Mystic Seer Phantom Force’s power by 75.
Getting an MP Refresh for Pierce the Veil! or being affected by a status move before using the Trainer move will help make Drifblim’s sync move stronger with Blind Spot, which boosts the sync move’s damage scaling with evasiveness.
For this build, the only option you should consider is Critical Strike 2. Gritty only affects moves, while Critical Strike will affect both moves and the sync move. Using Dire Hit + twice will guarantee that every attack is a critical hit.
Pass it On Build (Sync Level 3/5)
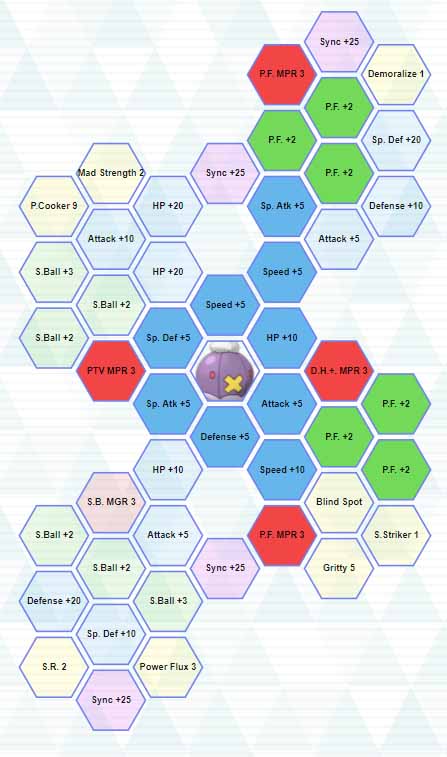
Total Sync Orb Cost: 750
Total Energy Used: 60
Unique Upgrades:
- Speed +10
- Phantom Force Power +8
- Dire Hit + MP Refresh 3
Lucky Skill: Critical Strike 2
Drifblim is an excellent way to set up for another Strike sync pair without exposing that sync pair to opponents. Using Phantom Force to reduce the sync move countdown before switching in to your buffed striker for their sync move.
With luck, Drifblim may receive a status condition or have Pierce the Veil! refresh multiple times to best conserve the limited stat boosting resources. This build picks up Dire Hit + MP Refresh 3 so that Drifblim can potentially pass the boosted critical-hit rate onto the last sync pair, or use it on himself again.
Since so much relies on the MP Refreshes, +8 additional power is added to Phantom Force to make it a total +12. Finally, since you plan to max out critical hit anyways, Critical Strike 2 is the most effective and consistent lucky skill to have.
Pass it On Alternative: (Sync Level 1/5)
Total Sync Orb Cost: 114
Total Energy Used: 7
Total Upgrades:
- HP + 10
- Defense +5
- Sp. Defense +5
- Speed +5
- Pierce the Veil! MP Refresh 3
If you aren’t planning on attacking with Drifblim and want to switch out immediately, almost all of his grid is useless to you. You’ll use 7 energy and 114 Orbs to pick up Pierce the Veil! MP Refresh 3. Save your lucky cookies for another sync pair.