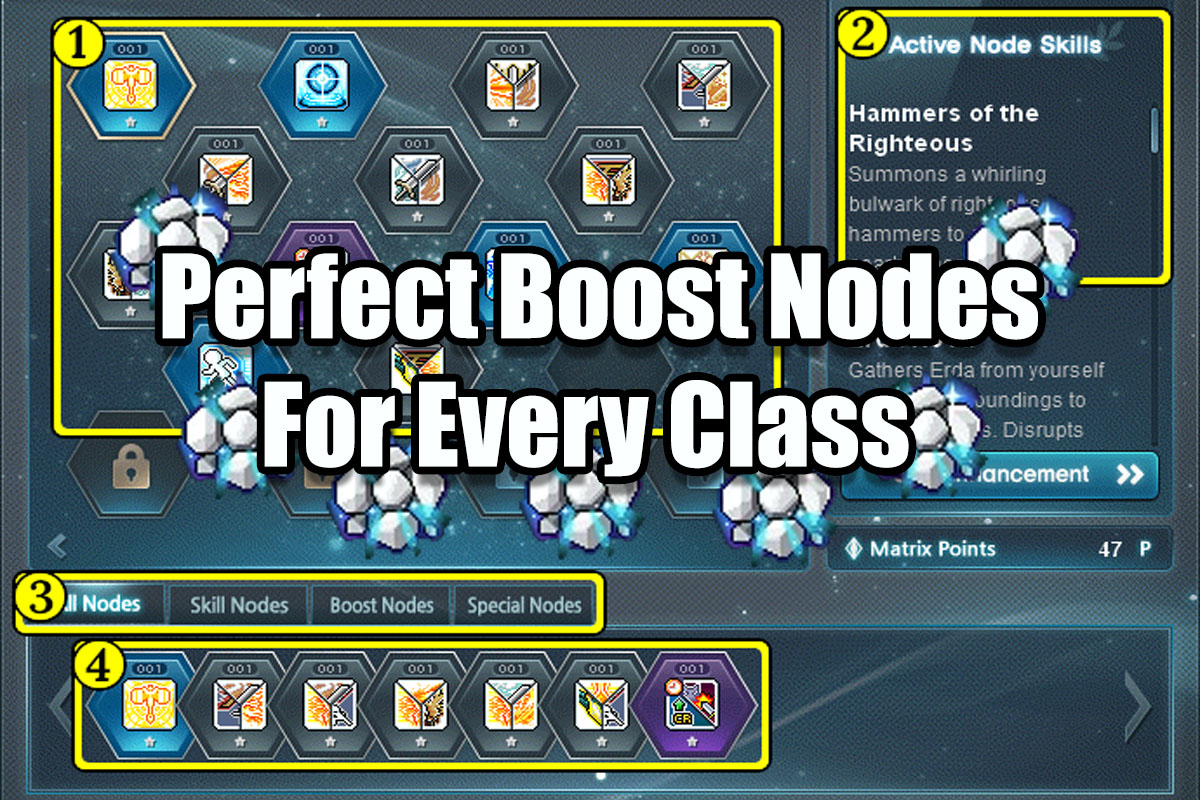
When you get to Arcane River you’ll get something called Nodestones. Nodestones contain stuff like 5th job skills, boost nodes, and special nodes. They are the core of your 5th job and V Matrix since that is where all your skills and damage are coming from.
In this article we will be focused on classes perfect boost nodes. Boost Nodes further increase the damage of your 1st-4th job skills. There are a lot of skills that can be boosted but not all are worth boosting for reasons like, no damage or you will not use the skill at all.
Understanding Boost Nodes
There are 3 key components when it comes to boost nodes. They are, the skills, the node level, and the order.
Boost Nodes will look like this,
You’ll notice that in 1 Boost Node you can fit 3 skills. Ideally, you want all 3 skills in that Boost Node to be skills you actually use and need boosting. Search for your class below for a chart of all the skills you want boosted.
For node level, you can see the number indicator above the skill icon in the node. As you level the node, all the skills in the node will also gain levels and increase accordingly. To level up Boost Nodes you need to fuse together similar copies of that boost node. The max level you can enhance/fuse up to is level 25.
When it comes to Boost Nodes, the order of the skills matter as well. Since you cannot have 2 nodes with the same name equipped in the V Matrix, the 1st skill is what will determine what the whole node is called.
Why does this matter? It’s because you want to boost your most used skills to level 60. The maximum level a single node can achieve is 30. By getting it to level 25 and putting it in a boosted level 5 slot. The maximum level a skill can achieve is 60 so in order to get your skill past level 30 you need another node with the same skills in it but different order.
Pathfinder Visual Example,
Trio # 1 + Boost Node 1 and Boost Node 2 + level 60

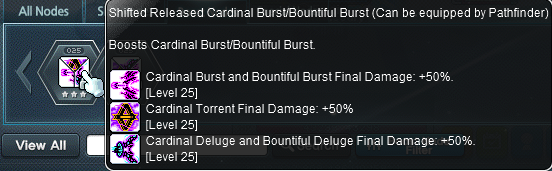
(notice how the top skill is different for these 2 nodes)
(+10 is when each node is in a boosted slot)
In the charts below you’ll see Trio # 1, Trio # 2 and sometimes Trio # 3. You do not have to get the nodes in that specific order if you’re making a main. You just need to make sure all the skills listed are boosted in any order. If you’re making a boss mule then most of the time you only need Trio # 1 to be the most efficient with your resources.
Best Way To Find Your Perfect Boost Nodes
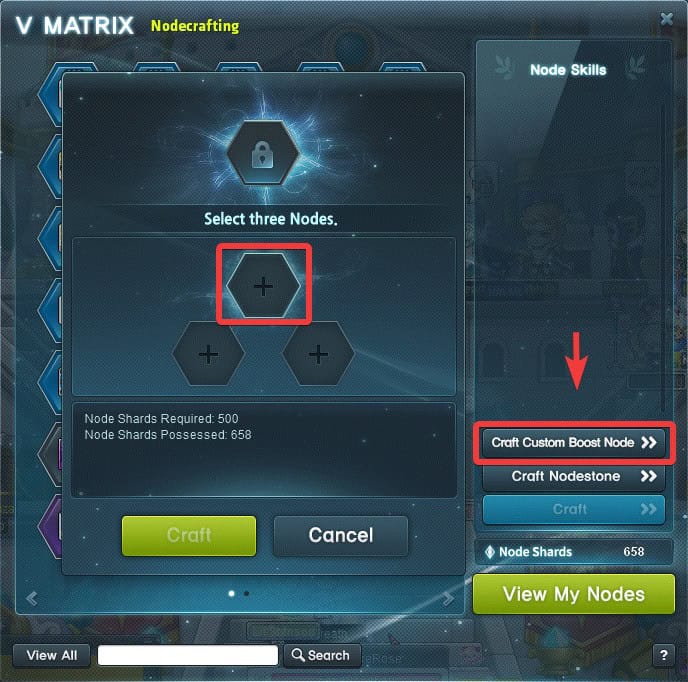
Once you know what skills you want for your class, open your V Matrix and click View My Nodes. From there you will see Craft Custom Boost Node and if you click that a section will pop up that will let you choose the 3 nodes. It requires 500 Node Shards which can be obtained by disassembling nodes.
The 1st slot (top of the triangle) is important since you cannot equip 2 nodes with the same name. So you just need to make sure when you craft your perfect pair of boost nodes you change the order.
Does Not Have To Be Perfect But If Lazy Just Copy
I put nodes in a specific order but that does not mean you have to as well. As long as you have all the skills listed and at max level you can do it in whichever order you want. But remember, the 1st node has to be different and you cannot equip 2 nodes with the same 1st line. (2nd and 3rd skill order does not matter)
Since it is much easier to make perfect nodes now if you just copy exactly what the nodes I have listed are, you will be fine.
Perfect Boost Nodes For Every Class
Adele
The perfect boost nodes for Adele are,
| Adele | Node # 1 | Node # 2 | Node # 3 | Node # 4 | Node # 5 |
| 1st Skill |  Cleave |  Aether Bloom and Blade Torrent |  Magic Dispatch and Aetherial Arms |  Reign of Destruction and Plummet |  Impale, Resonance Rush, Shardbreaker |
Aether Bloom and Blade Torrent |  Aether Forge and Noble Summons | Reign of Destruction and Plummet |  Hunting Decree and Grave Proclamation | Reign of Destruction and Plummet (can be anything) | |
Aether Forge and Noble Summons | Cleave | Hunting Decree and Grave Proclamation | Impale, Resonance Rush, Shardbreaker | Magic Dispatch and Aetherial Arms |
All The Skills You Need To Boost
- Cleave
- Aether Bloom and Blade Torrent
- Aether Forge and Noble Summons
- Magic Dispatch and Aetherial Arms
- Reign of Destruction and Plummet
- Hunting Decree and Grave Proclamation
- Impale, Resonance Rush, Shardbreaker
Remember, you cannot equip 2 nodes with the same 1st skill. So make sure the 1st skill in each node is different if you are going to make your own.
Angelic Buster
The perfect boost nodes for Angelic Buster are,
| Angelic Buster | Node # 1 | Node # 2 | Node # 3 | Node # 4 |
1st Skill | Trinity | Supreme Supernova | Celestial Roar | Soul Resonance |
| Supreme Supernova | Trinity | Soul Resonance | Celestial Roar |
Soul Seeker | Soul Seeker | Finale Ribbon | Finale Ribbon |
All The Skills You Need To Boost
 Trinity
 Supreme Supernova
 Soul Seeker
 Celestial Roar
 Soul Resonance
 Finale Ribbon
Remember, you cannot equip 2 nodes with the same 1st skill. So make sure the 1st skill in each node is different if you are going to make your own.
Aran
The perfect boost nodes for Aran are,
| Aran | Node # 1 | Node # 2 | Node # 3 | Node # 4 |
| 1st Skill |  Beyond Blade |  Hyper Finisher – Last Stand |  Smash Swing and Permafrost |  Final Attack |
Hyper Finisher – Last Stand | Beyond Blade | Final Attack | Smash Swing and Permafrost | |
 Finisher – Hunter’s Prey | Finisher – Hunter’s Prey |  Adrenaline Rush and Adrenaline Overload | Adrenaline Rush and Adrenaline Overload |
All The Skills You Need To Boost
- Beyond Blade
- Hyper Finisher – Last Stand
- Finisher – Hunter’s Prey
- Smash Swing and Permafrost
- Final Attack
- Adrenaline Rush and Adrenaline Overload
Remember, you cannot equip 2 nodes with the same 1st skill. So make sure the 1st skill in each node is different if you are going to make your own.
Ark
These are the perfect boost nodes for Ark,
| Ark | Node # 1 | Node # 2 | Node # 3 | Node # 4 | Node # 5 | Node # 6 |
| 1st Skill |  Overcharge Drive |  Ominous Nightmare/Dream |  Gust Charge Drive/ Insatiable Hunger |  Abyssal Charge Drive/ Unbridled Chaos |  Scarlet Charge/ Grievous Wound |  Unstoppable Impulse/ Tenacious Instinct |
Ominous Nightmare/Dream | Overcharge Drive | Abyssal Charge Drive/ Unbridled Chaos | Gust Charge Drive/ Insatiable Hunger | Unstoppable Impulse/ Tenacious Instinct | Scarlet Charge/ Grievous Wound | |
 Impending Death/ Vengeful Hate | Impending Death/ Vengeful Hate |  Creeping Terror/ Blissful Restraint/ Endless Agony | Creeping Terror/ Blissful Restraint/ Endless Agony | Anything | Anything |
All The Skills You Need To Boost
- Overcharge Drive
- Ominous Nightmare/Dream
- Impending Death/Vengeful Hate
- Gust Charge Drive/Insatiable Hunger
- Abyssal Charge Drive/Unbridled Chaos
- Creeping Terror/Blissful Restraint/Endless Agony
- Scarlet Charge/Grievous Wound
- Unstoppable Impulse/Tenacious Instinct
Remember, you cannot equip 2 nodes with the same 1st skill. So make sure the 1st skill in each node is different if you are going to make your own.
Battle Mage
The perfect boost nodes for Battle Mage are,
| Battle Mage | Node # 1 | Node # 2 | Node # 3 | Node # 4 |
| 1st Skill |  Finishing Blow |  Dark Shock |  Sweeping Staff |  Dark Genesis |
Dark Shock | Finishing Blow | Dark Genesis | Sweeping Staff | |
 Condemnation | Condemnation |  Battle Burst | Battle Burst |
All The Skills You Need To Boost
- Finishing Blow
- Dark Shock
- Condemnation
- Sweeping Staff
- Dark Genesis
- Battle Burst
Remember, you cannot equip 2 nodes with the same 1st skill. So make sure the 1st skill in each node is different if you are going to make your own.
Beast Tamer RIP (now known as Lynn)
Beast Tamers is gone and has been changed to Lynn. If you are a returning player, go to the Lynn boost node section.
The perfect boost nodes for Beast Tamer are,
| Beast Tamer | Trio # 1 (Bear Mode) | Trio # 2 (Leopard Mode) | Trio # 3 (Hawk Mode) |
Paw Swipe and Furious Strikes | Three-Point Pounce |  Formation Attack and Baby Bombers | |
Lil’ Fort |  Leopard’s Paw and Leopard’s Roar | Tornado Flight and Defensive Formation | |
Fishy Slap |
Bishop
The perfect boost nodes for Bishop are,
| Bishop | Node # 1 | Node # 2 | Node # 3 | Node # 4 |
| 1st Skill |  Angel Ray |  Big Bang |  Heal/Angelic Wrath |  Genesis/Triumph Feather |
Big Bang | Angel Ray | Genesis/Triumph Feather | Heal/Angelic Wrath | |
 Bahamut | Bahamut |  Heaven’s Door/Fountain of Vengeance | Heaven’s Door/Fountain of Vengeance |
All The Skills You Need To Boost
- Angel Ray
- Big Bang
- Bahamut
- Heal/Angelic Wrath
- Genesis/Triumph Feather
- Heaven’s Door/Fountain of Vengeance
Remember, you cannot equip 2 nodes with the same 1st skill. So make sure the 1st skill in each node is different if you are going to make your own.
Blaster
The perfect boost nodes for Blaster are,
| Blaster | Node # 1 | Node # 2 | Node # 3 | Node # 4 | Node # 5 |
| 1st Skill |  Magnum Punch |  Double Blast |  Shotgun Punch |  Hammer Smash |  Ballistic Hurricane |
Double Blast | Magnum Punch | Hammer Smash | Shotgun Punch |  Revolving Cannon/Revolving Cannon Mastery | |
 Bunker Buster Explosion | Bunker Buster Explosion | Revolving Cannon/Revolving Cannon Mastery | Ballistic Hurricane | Magnum Punch (can be anything) |
All The Skills You Need To Boost
- Magnum Punch
- Double Blast
- Bunker Buster Explosion
- Shotgun Punch
- Hammer Smash
- Revolving Cannon/Revolving Cannon Mastery
- Ballistic Hurricane
Remember, you cannot equip 2 nodes with the same 1st skill. So make sure the 1st skill in each node is different if you are going to make your own.
Blaze Wizard
The perfect boost nodes for Blaze Wizard are,
| Blaze Wizard | Node # 1 | Node # 2 | Node # 3 | Node # 4 |
| 1st Skill |  Orbital Flame |  Phoenix Drive |  Orbital Explosion |  Towering Inferno |
Phoenix Drive | Orbital Flame | Towering Inferno | Orbital Explosion | |
 Blazing Extinction | Blazing Extinction |  Flame Tempest/Blazing Blitz | Flame Tempest/Blazing Blitz |
All The Skills You Need To Boost
- Orbital Flame
- Phoenix Drive
- Blazing Extinction
- Orbital Explosion
- Towering Inferno
- Flame Tempest/Blazing Blitz
Remember, you cannot equip 2 nodes with the same 1st skill. So make sure the 1st skill in each node is different if you are going to make your own.
Bowmaster
The perfect boost nodes for Bowmaster are,
| Bowmaster | Node # 1 | Node # 2 | Node # 3 | Node # 4 | Node # 5 |
| 1st Skill |  Hurricane |  Quiver Cartridge |  Final Attack: Bow | Arrow Stream |  Phoenix |
Quiver Cartridge | Hurricane | Arrow Stream | Final Attack: Bow |  Gritty Gust | |
Arrow Blaster | Arrow Blaster | Gritty Gust | Phoenix |  Covering Fire (can be anything) |
All The Skills You Need To Boost
- Hurricane
- Quiver Cartridge
 Arrow Blaster
- Final Attack: Bow
 Arrow Stream
- Gritty Gust
- Pheonix
- Covering Fire (not necessary but you might as well put it here since you have a free slot)
Remember, you cannot equip 2 nodes with the same 1st skill. So make sure the 1st skill in each node is different if you are going to make your own.
Buccaneer
The perfect boost nodes for Buccaneer are,
| Buccaneer | Node # 1 | Node # 2 | Node # 3 | Node # 4 |
| 1st Skill |  Octopunch |  Sea Serpent’s Rage/Raging Serpent Assault |  Hook Bomber |  Sea Serpent Burst/Serpent Assault |
Sea Serpent’s Rage/Raging Serpent Assault | Octopunch | Sea Serpent Burst/Serpent Assault | Hook Bomber | |
 Nautilus Strike | Nautilus Strike |  Corkscrew Blow | Corkscrew Blow |
All The Skills You Need To Boost
- Octopunch
- Sea Serpent’s Rage/Raging Serpent Assault
- Nautilus Strike
- Hook Bomber
- Sea Serpent Burst/Serpent Assault
- Corkscrew Blow
Remember, you cannot equip 2 nodes with the same 1st skill. So make sure the 1st skill in each node is different if you are going to make your own.
Cadena
The perfect boost nodes for Cadena are,
| Cadena | Node # 1 | Node # 2 | Node # 3 | Node # 4 | Node # 5 | Node # 6 |
| 1st Skill |  Thrash, Muscle Memory & Reign of Chains |  Summon Brick |  Summon Daggers & Shuriken |  Summon Shotgun & Decoy Bomb |  Chain Arts: Beatdown |  Crush & Veteran Shadowdealer |
Summon Brick | Thrash, Muscle Memory & Reign of Chains | Summon Shotgun & Decoy Bomb | Summon Daggers & Shuriken | Crush & Veteran Shadowdealer | Chain Arts: Beatdown | |
 Summon Spiked Bat | Summon Spiked Bat |  Summon Scimitar/Summon Claw/Chain yank | Summon Scimitar/Summon Claw/Chain yank | Thrash, Muscle Memory & Reign of Chains | Summon Spiked Bat |
All The Skills You Need To Boost
- Thrash, Muscle Memory & Reign of Chains
- Summon Brick
- Summon Spiked Bat
- Summon Daggers & Shuriken
- Summon Shotgun & Decoy Bomb
- Summon Scimitar/Summon Claw/Chain Yank
- Chain Arts: Beatdown
- Crush & Veteran Shadowdealer
Remember, you cannot equip 2 nodes with the same 1st skill. So make sure the 1st skill in each node is different if you are going to make your own.
Cannoneer
The perfect boost nodes for Cannoneer are,
| Cannoneer | Node # 1 | Node # 2 | Node # 3 | Node # 4 | Node # 5 |
| 1st Skill |  Cannon Barrage |  Cannon Bazooka |  Monkey Militia |  Anchor Away |  Nautilus Strike |
Cannon Bazooka | Cannon Barrage | Anchor Away | Nautilus Strike | Monkey Militia | |
 Rolling Rainbow | Rolling Rainbow |  Monkey Fury/Monkey Mortar | Monkey Fury/Monkey Mortar | Cannon Barrage (can be anything) |
All The Skills You Need To Boost
- Cannon Barrage
- Cannon Bazooka
- Rolling Rainbow
- Monkey Militia
- Anchor Away
- Monkey Fury/Monkey Mortar
- Nautilus Strike
Remember, you cannot equip 2 nodes with the same 1st skill. So make sure the 1st skill in each node is different if you are going to make your own.
Corsair
The perfect boost nodes for Corsair are,
| Corsair | Node # 1 | Node # 2 | Node # 3 | Node # 4 | Node # 5 | Node # 6 |
| 1st Skill |  Rapid Fire |  Brain Scrambler |  Nautilus Strike |  Eight-Legs Easton |  Broadside |  Scurvy Summons |
Brain Scrambler | Rapid Fire | Eight-Legs Easton | Nautilus Strike | Scurvy Summons | Broadside | |
Majestic Presence | Majestic Presence |  Ugly Bomb | Ugly Bomb |  Siege Bomber | Siege Bomber |
All The Skills You Need To Boost
- Rapid Fire
- Brain Scrambler
Majestic Presence
- Nautilus Strike
- Eight-Legs Easton
- Ugly Bomb
- Broadside
- Scurvy Summons
- Siege Bomber
Remember, you cannot equip 2 nodes with the same 1st skill. So make sure the 1st skill in each node is different if you are going to make your own.
Dark Knight
The perfect boost nodes for Dark Knight are,
| Dark Knight | Node # 1 | Node # 2 | Node # 3 | Node # 4 |
| 1st Skill | Gungnir’s Descent |  Evil Eye |  Dark Impale |  Final Attack |
Evil Eye | Gungnir’s Descent | Final Attack | Dark Impale | |
 Nightshade Explosion | Nightshade Explosion |  Leap Attack, Rush, Upward Charge | Leap Attack, Rush, Upward Charge |
All The Skills You Need To Boost
 Gungnir’s Descent
- Evil Eye
- Nightshade Explosion
- Dark Impale
- Final Attack
- Leap Attack, Rush, Upward Charge
Remember, you cannot equip 2 nodes with the same 1st skill. So make sure the 1st skill in each node is different if you are going to make your own.
Dawn Warrior
The perfect boost nodes for Dawn Warrior are,
| Dawn Warrior | Node # 1 | Node # 2 | Node # 3 |
| 1st Skill |  Cosmic Burst |  Cosmic Shower |  Solar Slash and Luna Divide |
Cosmic Shower |  Equinox Slash | Equinox Slash | |
Solar Slash and Luna Divide | Cosmic Burst |  Impaling Rays (can be anything) |
All The Skills You Need To Boost
- Cosmic Burst
- Cosmic Shower
- Solar Slash and Luna Divide
- Equinox Slash
- Impaling Rays (not necessary but you might as well put it here since you have a free slot)
Remember, you cannot equip 2 nodes with the same 1st skill. So make sure the 1st skill in each node is different if you are going to make your own.
Demon Avenger
The perfect boost nodes for Demon Avenger are,
| Demon Avenger | Node # 1 | Node # 2 | Node # 3 | Node # 4 |
| 1st Skill |  Exceed: Execution |  Nether Shield |  Exceed: Lunar Slash |  Thousand Swords |
Nether Shield | Exceed: Execution | Thousand Swords | Exceed: Lunar Slash | |
 Infernal Exceed | Infernal Exceed |  Bat Swarm | Bat Swarm |
All The Skills You Need To Boost
- Exceed: Execution
- Nether Shield
- Infernal Exceed
- Exceed: Lunar Slash
- Thousand Swords
- Bat Swarm
Remember, you cannot equip 2 nodes with the same 1st skill. So make sure the 1st skill in each node is different if you are going to make your own.
Demon Slayer
The perfect boost nodes for Demon Slayer are,
| Demon Slayer | Node # 1 | Node # 2 | Node # 3 | Node # 4 |
| 1st Skill |  Demon Impact |  Demon Lash |  Infernal Concussion |  Demon Cry |
Demon Lash | Demon Impact | Demon Cry | Infernal Concussion | |
 Cerberus Chomp | Cerberus Chomp |  Dark Metamorphosis | Dark Metamorphosis |
All The Skills You Need To Boost
- Demon Impact
- Demon Lash
- Cerberus Chomp
- Infernal Concussion
- Demon Cry
- Dark Metamorphosis
Remember, you cannot equip 2 nodes with the same 1st skill. So make sure the 1st skill in each node is different if you are going to make your own.
Dual Blade
The perfect boost nodes for Dual Blade are,
| Dual Blade | Node # 1 | Node # 2 | Node # 3 | Node # 4 |
| 1st Skill |  Phantom Blow |  Blade Clone |  Sudden Raid |  Blade Fury |
Blade Clone | Phantom Blow | Blade Fury | Sudden Raid | |
 Asura’s Anger | Asura’s Anger |  Blade Ascension | Blade Ascension |
All The Skills You Need To Boost
- Phantom Blow
- Blade Clone
- Asura’s Anger
- Sudden Raid
- Blade Fury
- Blade Ascension
Remember, you cannot equip 2 nodes with the same 1st skill. So make sure the 1st skill in each node is different if you are going to make your own.
Evan
The perfect boost nodes for Evan are,
| Evan | Node # 1 | Node # 2 | Node # 3 | Node # 4 | Node # 5 | Node # 6 |
| 1st Skill |  Thunder Circle, Thunder Flash, Thunder Dive |  Wind Circle,Wind Flash, Wind Breath |  Dragon Breath and Return Flame |  Mana Burst |  Dragon Dive |  Dragon Spark |
Wind Circle,Wind Flash, Wind Breath | Thunder Circle, Thunder Flash, Thunder Dive | Mana Burst | Dragon Breath and Return Flame | Dragon Spark | Dragon Dive | |
 Earth Circle, Earth Breath, Earth Dive | Earth Circle, Earth Breath, Earth Dive |  Magic Debris | Magic Debris |  Dragon Flash | Dragon Flash |
All The Skills You Need To Boost
- Thunder Circle
- Wind Circle
- Earth Circle
- Dragon Breath
- Mana Burst
- Magic Debris
- Dragon Dive
- Dragon Spark
- Dragon Flash
Remember, you cannot equip 2 nodes with the same 1st skill. So make sure the 1st skill in each node is different if you are going to make your own.
Fire/Poison Arch Mage
The perfect boost nodes for Fire/Poison Arch Mage are,
| Fire/Poison Arch Mage | Node # 1 | Node # 2 | Node # 3 | Node # 4 | Node # 5 | Node # 6 |
| 1st Skill |  Flame Sweep |  Ignite |  Mist Eruption |  Flame Haze |  Megiddo Flame |  Ifrit |
Ignite | Flame Sweep | Flame Haze | Mist Eruption | Ifrit | Megiddo Flame | |
 Teleport Mastery/Creeping Toxin | Teleport Mastery/Creeping Toxin |  Meteor Shower | Meteor Shower |  Inferno Aura | Inferno Aura |
All The Skills You Need To Boost
- Flame Sweep
- Ignite
- Teleport Mastery/Creeping Toxin
- Mist Eruption
- Flame Haze
- Meteor Shower
- Megiddo Flame
- Ifrit
- Inferno Aura
Remember, you cannot equip 2 nodes with the same 1st skill. So make sure the 1st skill in each node is different if you are going to make your own.
Hayato
The perfect boost nodes for Hayato are,
| Hayato | Node # 1 | Node # 2 | Node # 3 | Node # 4 |
| 1st Skill | [Shinsoku] Mist Slash | [Battou] Full Moon’s Rage | [Battou] Dark Moon Cut | [Shinsoku] Silent Arc |
[Battou] Full Moon’s Rage | [Shinsoku] Mist Slash | [Shinsoku] Grazing Cut | [Battou] Dark Moon Cut | |
[Shinsoku] Afterimage Slash | [Shinsoku] Afterimage Slash | [Shinsoku] Silent Arc | [Shinsoku] Grazing Cut |
All The Skills You Need To Boost
 [Shinsoku] Mist Slash
 [Battou] Full Moon’s Rage
 [Shinsoku] Afterimage Slash
 [Shinsoku] Silent Arc
 [Battou] Dark Moon Cut
 [Shinsoku] Grazing Cut
Remember, you cannot equip 2 nodes with the same 1st skill. So make sure the 1st skill in each node is different if you are going to make your own.
Hero
The perfect boost nodes for Hero are,
| Hero | Node # 1 | Node # 2 | Node # 3 | Node # 4 |
| 1st Skill |  Raging Blow |  Cry Valhalla |  Rising Rage |  Beam Blade |
Cry Valhalla | Raging Blow | Beam Blade | Rising Rage | |
Final Attack | Final Attack |  Puncture | Puncture |
All The Skills You Need To Boost
- Raging Blow
- Cry Valhalla
Final Attack
- Rising Rage
- Beam Blade
- Puncture
Remember, you cannot equip 2 nodes with the same 1st skill. So make sure the 1st skill in each node is different if you are going to make your own.
Hoyoung
The perfect boost nodes for Hoyoung are,
| HoYoung | Node # 1 | Node # 2 | Node # 3 | Node # 4 | Node # 5 | Node # 6 |
| 1st Skill |  Clone |  Humanity |  Star Vortex |  Heaven |  Butterfly Dream |  Talisman: Evil-Sealing Gourd/Swift Sally/Thousand-Ton Stone |
Humanity | Clone | Heaven | Star Vortex | Talisman: Evil-Sealing Gourd/Swift Sally/Thousand-Ton Stone | Butterfly Dream | |
 Earth | Earth |  Talisman: Seeking Ghost Flame | Talisman: Seeking Ghost Flame |  Degeneration | Degeneration |
All The Skills You Need To Boost
- Clone
- Humanity
- Earth
- Star Vortex
- Heaven
- Talisman: Seeking Ghost Flame
- Butterfly Dream
- Talisman: Evil-Sealin Gourd/Swift Sally/Thousand-Ton Stone
- Degeneration
Remember, you cannot equip 2 nodes with the same 1st skill. So make sure the 1st skill in each node is different if you are going to make your own.
Ice/Lightning Arch Mage
The perfect boost nodes for Ice/Lightning Arch Mage are,
| Ice/Lightning Arch Mage | Node # 1 | Node # 2 | Node # 3 | Node # 4 |
| 1st Skill |  Chain Lightning |  Lightning Orb |  Frozen Orb |  Elquines |
Lightning Orb | Chain Lightning | Elquines | Frozen Orb | |
 Thunder Sphere | Thunder Sphere |  Blizzard | Blizzard |
All The Skills You Need To Boost
- Chain Lightning
- Lightning Orb
- Thunder Sphere
- Frozen Orb
- Elquines
- Blizzard
Remember, you cannot equip 2 nodes with the same 1st skill. So make sure the 1st skill in each node is different if you are going to make your own.
Illium
The perfect boost nodes for Illium are,
| Illium | Node # 1 | Node # 2 | Node # 3 | Node # 4 | Node # 5 | Node # 6 |
| 1st Skill |  Radiant Javelin 2 and Winged Javelin |  Machina & Reaction – Domination 2 |  Longinus Spear |  Umbral Brand 3 |  Longinus Zone |  Vortex Wings & Crystal Skill – Vortex of Light |
Machina & Reaction – Domination 2 | Radiant Javelin 2 and Winged Javelin | Umbral Brand 3 | Longinus Spear | Vortex Wings & Crystal Skill – Vortex of Light | Longinus Zone | |
 Reaction – Destruction 2 | Reaction – Destruction 2 |  Deus & Ex | Deus & Ex | Anything | Anything |
All The Skills You Need To Boost
- Radiant Javelin 2 & Winged Javelin
- Machina & Reaction – Domination 2
- Reaction – Destruction 2
- Longinus Spear
- Umbral Brand 3
- Deus & Ex
- Longinus Zone
- Vortex Wings & Crystal Skill – Vortex of Light
Remember, you cannot equip 2 nodes with the same 1st skill. So make sure the 1st skill in each node is different if you are going to make your own.
Jett RIP
The perfect boost nodes for Jett are,
| Jett | Trio # 1 | Trio # 2 |
Planet Buster | Singularity Shock | |
Vortex Cross | Starforce Salvo and Strikeforce Showdown | |
Falling Stars and Turret Deployment | Backup Beatdown and Starfall |
Kain
The perfect boost nodes for Kain are,
| Kain | Node # 1 | Node # 2 | Node # 3 | Node # 4 | Node # 5 | Node # 6 |
| 1st Skill | Strike Arrow/Chasing Shot |  Dragon Fang/Lasting Grudge |  Shaft Break |  Falling Dust |  Chain Sickle/Poison Needle |  Phantom Blade/Tearing Knife |
Dragon Fang/Lasting Grudge | Strike Arrow/Chasing Shot | Falling Dust | Shaft Break | Phantom Blade/Tearing Knife | Chain Sickle/Poison Needle | |
 Death’s Blessing/Unseen Sniper | Death’s Blessing/Unseen Sniper |  Scattering Shot | Scattering Shot | Anything | Anything |
All The Skills You Need To Boost
 Strike Arrow/Chasing Shot
- Dragon Fang/Lasting Grudge
- Death’s Blessing/Unseen Sniper
- Shaft Break
- Falling Dust
- Scattering Shot
- Chain Sickle//Poison Needle
- Phantom Blade/Tearing Knife
Remember, you cannot equip 2 nodes with the same 1st skill. So make sure the 1st skill in each node is different if you are going to make your own.
Kaiser
The perfect boost nodes for Kaiser are,
| Kaiser | Node # 1 | Node # 2 | Node # 3 | Node # 4 |
| 1st Skill |  Gigas Wave |  Blade Burst |  Inferno Breath |  Stone Dragon |
Blade Burst | Gigas Wave | Stone Dragon | Inferno Breath | |
 Tempest Blades | Tempest Blades |  Wing Beat | Wing Beat |
All The Skills You Need To Boost
- Gigas Wave
- Blade Burst
- Tempest Blades
- Inferno Breath
- Stone Dragon
- Wing Beat
Remember, you cannot equip 2 nodes with the same 1st skill. So make sure the 1st skill in each node is different if you are going to make your own.
Kanna
The perfect boost nodes for Kanna are,
| Kanna | Node # 1 | Node # 2 | Node # 3 | Node # 4 | Node # 5 | Node # 6 |
| 1st Skill | Summon Oni | Summon Tengu | [Order] Pulverizing Strike | [Order] Shade-Fletched Arrow | [Order] Spinning Strike | Soul-Shatter Talisman: Dance |
Summon Tengu | Summon Oni | [Order] Shade-Fletched Arrow | [Order] Pulverizing Strike | Soul-Shatter Talisman: Dance | [Order] Spinning Strike | |
Summon Orochi | Summon Orochi | [Order] Execute | [Order] Execute | Heart-Wreck Talisman | Heart-Wreck Talisman |
All The Skills You Need To Boost
 Summon Oni
 Summon Tengu
 Summon Orochi
 [Order] Pulverizing Strike
 [Order] Shade-Fletched Arrow
 [Order] Execute
 [Order] Spinning Strike
 Soul-Shatter Talisman: Dance
 Heart-Wreck Talisman
Remember, you cannot equip 2 nodes with the same 1st skill. So make sure the 1st skill in each node is different if you are going to make your own.
Khali
The perfect boost nodes for Khali are,
| Khali | Node # 1 | Node # 2 | Node # 3 | Node # 4 |
| 1st Skill | Arts: Flurry/Crescentum | Chakram Sweep/Split/Fury | Resonate/Deceiving Blade | Void Blitz |
Chakram Sweep/Split/Fury | Arts: Flurry/Crescentum | Void Blitz | Resonate/Deceiving Blade | |
Void Rush | Void Rush | Death Blossom | Death Blossom |
All The Skills You Need To Boost
Arts: Flurry/Crescentum
Chakram Sweep/Split/Fury
Void Rush
Resonate/Deceiving Blade
Void Blitz
Death Blossom
Remember, you cannot equip 2 nodes with the same 1st skill. So make sure the 1st skill in each node is different if you are going to make your own.
Kinesis
The perfect boost nodes for Kinesis are,
| Kinesis | Node # 1 | Node # 2 | Node # 3 | Node # 4 |
| 1st Skill |  Psychic Grab |  Ultimate – B.P.M |  Ultimate – Trainwreck |  Kinetic Combo |
Ultimate – B.P.M | Psychic Grab | Kinetic Combo | Ultimate – Trainwreck | |
 Ultimate – Metal Press | Ultimate – Metal Press |  Psychic Drain | Psychic Drain |
All The Skills You Need To Boost
- Psychic Grab
- Ultimate – B.P.M
- Ultimate – Metal Press
- Ultimate – Trainwreck
- Kinetic Combo
- Psychic Drain
Remember, you cannot equip 2 nodes with the same 1st skill. So make sure the 1st skill in each node is different if you are going to make your own.
Lara
The perfect boost nodes for Lara are,
| Lara | Node # 1 | Node # 2 | Node # 3 | Node # 4 |
| 1st Skill |  Essence Sprinkle |  Dragon Vein Eruption |  Mountain Seeds |  Wakeup Call |
Dragon Vein Eruption | Essence Sprinkle | Wakeup Call | Mountain Seeds | |
 Mountain Kid | Mountain Kid |  Dragon Vein Absorption | Dragon Vein Absorption |
All The Skills You Need To Boost
- Essence Sprinkle
- Mountain Kid
- Dragon Vein Eruption
- Mountain Seeds
- Wakeup Call
- Dragon Vein Absorption
Remember, you cannot equip 2 nodes with the same 1st skill. So make sure the 1st skill in each node is different if you are going to make your own.
Lynn
The perfect boost nodes for Lynn are,
| Lynn | Node # 1 | Node # 2 | Node # 3 | Node # 4 |
| 1st Skill | Peck | Strike | Earth Pulverization and Roar | Predator’s Blow and Raid |
Strike | Peck | Predator’s Blow and Raid | Earth Pulverization and Roar | |
Sneak Attack | Sneak Attack | Sweep and Whirlwind | Sweep and Whirlwind |
All The Skills You Need To Boost
Peck
Strike
Sneak Attack
Earth Pulverization and Roar
Predator’s Blow and Raid
Sweep and Whirlwind
Remember, you cannot equip 2 nodes with the same 1st skill. So make sure the 1st skill in each node is different if you are going to make your own.
Luminous
The perfect boost nodes for Luminous are,
| Luminous | Node # 1 | Node # 2 | Node # 3 |
| 1st Skill |  Reflection |  Apocalypse |  Twilight Nova |
Apocalypse | Twilight Nova | Reflection | |
 Ender | Ender | Anything (Moonlight Spear or Armageddon) |
All The Skills You Need To Boost
- Reflection
- Apocalypse
- Ender
- Twilight Nova
Remember, you cannot equip 2 nodes with the same 1st skill. So make sure the 1st skill in each node is different if you are going to make your own.
Marksman
The perfect boost nodes for Marksman are,
| Marksman | Node # 1 | Node # 2 | Node # 3 | Node # 4 |
| 1st Skill |  Snipe | Piercing Arrow/Empowered Piercing Arrow |  High Speed Shot/Arrow Illusion |  Final Attack: Crossbow |
Piercing Arrow/Empowered Piercing Arrow | Snipe | Final Attack: Crossbow | High Speed Shot/Arrow Illusion | |
 Bolt Burst/Frostprey | Bolt Burst/Frostprey |  Covering Fire/Swift Surge | Covering Fire/Swift Surge |
All The Skills You Need To Boost
- Snipe
 Piercing Arrow/Empowered Piercing Arrow
- Bolt Burst/Frostprey
- High Speed Shot/Arrow Illusion
- Final Attack: Crossbow
- Covering Fire/Swift Surge
Remember, you cannot equip 2 nodes with the same 1st skill. So make sure the 1st skill in each node is different if you are going to make your own.
Mechanic
The perfect boost nodes for Mechanic are,
| Mechanic | Node # 1 | Node # 2 | Node # 3 | Node # 4 |
| 1st Skill | Homing Beacon and Advanced Homing Beacon |  Heavy and AP Salvo Plus |  Rock ‘n Shock |  Bots ‘n Tots |
Heavy and AP Salvo Plus | Homing Beacon and Advanced Homing Beacon | Bots ‘n Tots | Rock ‘n Shock | |
 Distortion Bomb | Distortion Bomb |  Robo Launcher RM7 | Robo Launcher RM7 |
All The Skills You Need To Boost
 Homing Beacon
- Heavy and AP Salvo Plus
- Distortion Bomb
- Rock ‘n Shock
- Bots ‘n Tots
- Robo Launcher RM7
Remember, you cannot equip 2 nodes with the same 1st skill. So make sure the 1st skill in each node is different if you are going to make your own.
Mercedes
The perfect boost nodes for Mercedes are,
| Mercedes | Node # 1 | Node # 2 | Node # 3 | Node # 4 | Node # 5 | Node # 6 |
| 1st Skill |  Wrath of Enlil |  Spikes Royale |  Ishtar’s Ring |  Stunning Strikes |  Rising Rush |  Lightning Edge |
Spikes Royale | Wrath of Enlil | Stunning Strikes | Ishtar’s Ring | Lightning Edge | Rising Rush | |
 Leaf Tornado/Gust Dive | Leaf Tornado/Gust Dive |  Unicorn Spike | Unicorn Spike |  Elemental Knights | Elemental Knights |
All The Skills You Need To Boost
- Wrath of Enlil
- Spikes Royale
- Leaf Tornado/Gust Dive
- Ishtar’s Ring
- Stunning Strikes
- Unicorn Spike
- Rising Rush
- Lightning Edge
- Elemental Knights
Remember, you cannot equip 2 nodes with the same 1st skill. So make sure the 1st skill in each node is different if you are going to make your own.
Mihile
The perfect boost nodes for Mihile are,
| Mihile | Node # 1 | Node # 2 | Node # 3 | Node # 4 |
| 1st Skill | Radiant Cross | Royal Guard and Offensive Defense | Final Attack | Charging Light |
Royal Guard and Offensive Defense | Radiant Cross | Charging Light | Final Attack | |
Install Shield and Soul Majesty | Install Shield and Soul Majesty | Radiant Driver/Vertical Radiant Driver | Radiant Driver/Vertical Radiant Driver |
All The Skills You Need To Boost
Radiant Cross
Royal Guard and Offensive Defense
Install Shield and Soul Majesty
Final Attack
Charging Light
Radiant Driver/Vertical Radiant Driver (not necessary but you might as well put this here)
Remember, you cannot equip 2 nodes with the same 1st skill. So make sure the 1st skill in each node is different if you are going to make your own.
Mo Xuan
The perfect boost nodes for Mo Xuan are,
| Mo Xuan | Node # 1 | Node # 2 | Node # 3 | Node # 4 | Node # 5 | Node # 6 |
| 1st Skill | Xuanshan Arts [Di] | Xuanshan Arts [Tian] | Divine Art: Erupting Flame | Divine Art: Righteous Thunder | Soul Art: Black Wind | Divine Art: Tearing Wind |
Xuanshan Arts [Tian] | Xuanshan Arts [Di] | Divine Art: Righteous Thunder | Divine Art: Erupting Flame | Divine Art: Tearing Wind | Soul Art: Black Wind | |
Divine Art: Howling Storm | Divine Art: Howling Storm | Divine Art: Swirling Tide | Divine Art: Swirling Tide | Secret Art: Qi Projection | Secret Art: Qi Projection |
All The Skills You Need To Boost
Xuanshan Arts [Di]
Xuanshan Arts [Tian]
Divine Art: Howling Storm
Divine Art: Erupting Flame
Divine Art: Righteous Thunder
Divine Art: Swirling Tide
Soul Art: Black Wind
Divine Art: Tearing Wind
Secret Art: Qi Projection
Remember, you cannot equip 2 nodes with the same 1st skill. So make sure the 1st skill in each node is different if you are going to make your own.
Night Lord
The perfect boost nodes for Night Lord are,
| Night Lord | Node # 1 | Node # 2 | Node # 3 | Node # 4 |
| 1st Skill |  Quad Star |  Assassin’s Mark |  Dark Flare |  Death Star |
Assassin’s Mark | Quad Star | Death Star | Dark Flare | |
 Showdown | Showdown |  Sudden Raid | Sudden Raid |
All The Skills You Need To Boost
- Quad Star
- Assassin’s Mark
- Showdown
- Dark Flare
- Death Star
- Sudden Raid
Remember, you cannot equip 2 nodes with the same 1st skill. So make sure the 1st skill in each node is different if you are going to make your own.
Night Walker
The perfect boost nodes for Night Walker are,
| Night Walker | Node # 1 | Node # 2 | Node # 3 | Node # 4 |
| 1st Skill | Quintuple Star | Dark Omen | Shadow Spark | Shadow Stitch |
Dark Omen | Quintuple Star | Shadow Stitch | Shadow Spark | |
Shadow Bat and Ravenous Bat | Shadow Bat and Ravenous Bat | Dominion | Dominion |
All The Skills You Need To Boost
Quintuple Star
Dark Omen
Shadow Bat and Ravenous Bat
Dominion
Shadow Stitch (technically don’t need this skill but I would add)
Shadow Spark (technically don’t need this skill but I would add)
Remember, you cannot equip 2 nodes with the same 1st skill. So make sure the 1st skill in each node is different if you are going to make your own.
Paladin
The perfect boost nodes for Paladin are,
| Paladin | Node # 1 | Node # 2 | Node # 3 | Node # 4 |
| 1st Skill |  Blast |  Divine Judgement/Divine Mark |  Divine Charge |  Final Attack |
Divine Judgement/Divine Mark | Blast | Final Attack | Divine Charge | |
 Heaven’s Hammer | Heaven’s Hammer |  Smite Shield | Smite Shield |
All The Skills You Need To Boost
- Blast
- Divine Judgement/Divine Mark
- Heaven’s Hammer
- Divine Charge
- Final Attack
- Smite Shield
Remember, you cannot equip 2 nodes with the same 1st skill. So make sure the 1st skill in each node is different if you are going to make your own.
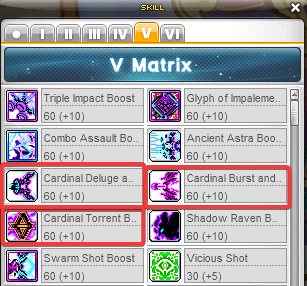
Pathfinder
The perfect boost nodes for Pathfinder are,
| Pathfinder | Node # 1 | Node # 2 | Node # 3 | Node # 4 | Node # 5 |
| 1st Skill |  Cardinal Burst and Bountiful Burst |  Cardinal Deluge and Bountiful Deluge |  Shadow Raven |  Cardinal Torrent |  Combo Assault |
Cardinal Deluge and Bountiful Deluge | Cardinal Burst and Bountiful Burst |  Ancient Astra | Shadow Raven | Cardinal Torrent | |
 Glyph of Impalement | Glyph of Impalement | Combo Assault | Ancient Astra | Anything (Swarm Shot or Triple Impact) |
All The Skills You Need To Boost
- Cardinal Burst and Bountiful Burst
- Cardinal Deluge and Bountiful Deluge
- Glyph of Impalement
- Shadow Raven
- Ancient Astra
- Combo Assault
- Cardinal Torrent
 Swarm Shot or
  Triple Impact (not necessary but if you have the old setup you don’t need to change anything)
Remember, you cannot equip 2 nodes with the same 1st skill. So make sure the 1st skill in each node is different if you are going to make your own.
Phantom
The perfect boost nodes for Phantom are,
| Phantom | Node # 1 | Node # 2 | Node # 3 | Node # 4 | Node # 5 | Node # 6 |
| 1st Skill |  Mille Aiguilles |  Tempest |  Impeccable Memory 4 |  Penombre |  Blason Fantome |  Impeccable Memory 3 |
Tempest | Mille Aiguilles | Penombre | Impeccable Memory 4 | Impeccable Memory 3 | Blason Fantome | |
 Carte Blanc and Carte Noir | Carte Blanc and Carte Noir |  Rose Carte Finale | Rose Carte Finale |  Impeccable Memory 2 | Impeccable Memory 2 |
Once you hit level 260 and unlock HEXA Millie Aiguilles and Sol Janus you will not need Node #5 and #6 anymore. Node 5 and 6 were only useful for mobbing pre 6th job.
All The Skills You Need To Boost
- Millie Aiguilles
- Tempest
- Carte Blanc and Carte Noir
- Impeccable Memory 4
- Penombre
- Rose Carte Finale
- Impeccable Memory 2 (not necessary after you hit level 260)
- Impeccable Memory 3 (not necessary after you hit level 260)
- Blason Fantome (not necessary after you hit level 260)
Remember, you cannot equip 2 nodes with the same 1st skill. So make sure the 1st skill in each node is different if you are going to make your own.
Ren
The perfect boost nodes for Ren are,
| Ren | Node # 1 | Node # 2 | Node # 3 | Node # 4 |
| 1st Skill | Spirit Strike | Burrowing Earth/Ravenous Spirit/Years Uncounted | Riotous Heart | Storm |
Burrowing Earth/Ravenous Spirit/Years Uncounted | Spirit Strike | Storm | Riotous Heart | |
Raining Blossoms | Raining Blossoms | Serpent’s Fang/Unbowed Blade | Serpent’s Fang/Unbowed Blade |
 Spirit Strike
 Burrowing Earth/Ravenous Spirit/Years Uncounted
 Raining Blossoms
 Riotous Heart
 Storm
Storm Serpent’s Fang/Unbowed Blade
Remember, you cannot equip 2 nodes with the same 1st skill. So make sure the 1st skill in each node is different if you are going to make your own.
Shade
The perfect boost nodes for Shade are,
| Shade | Node # 1 | Node # 2 | Node # 3 | Node # 4 |
| 1st Skill |  Spirit Claw |  Bomb Punch |  Spirit Frenzy |  Death Mark |
Bomb Punch | Spirit Claw | Death Mark | Spirit Frenzy | |
 Fox Spirits | Fox Spirits |  / / Spirit Incarnation or Soul Splitter | / Spirit Incarnation or Soul Splitter |
All The Skills You Need To Boost
- Spirit Claw
- Bomb Punch
- Fox Spirits
- Spirit Frenzy
- Death Mark
- / Spirit Incarnation or Soul Splitter (filler spot, either one works since they are not for damage)
Remember, you cannot equip 2 nodes with the same 1st skill. So make sure the 1st skill in each node is different if you are going to make your own
Shadower
The perfect boost nodes for Shadower are,
| Shadower | Node # 1 | Node # 2 | Node # 3 | Node # 4 |
| 1st Skill |  Assassinate |  Shadow Veil |  Sudden Raid |  Dark Flare |
Shadow Veil | Assassinate | Dark Flare | Sudden Raid | |
 Meso Explosion | Meso Explosion |  Cruel Stab | Cruel Stab |
All The Skills You Need To Boost
- Assassinate
- Shadow Veil
- Meso Explosion
- Sudden Raid
- Dark Flare
- Cruel Stab
Remember, you cannot equip 2 nodes with the same 1st skill. So make sure the 1st skill in each node is different if you are going to make your own
Sia Astelle
The perfect boost nodes for Sia Astelle are,
| Sia Astelle | Node # 1 | Node # 2 | Node # 3 | Node # 4 | Node # 5 | Node # 6 | Node # 7 |
| 1st Skill |  Ray |  Boom |  Starlight |  Stellar I – Antares |  Stellar VII – Vega |  Stellar VI – Izar |  Stellar IX – Canopus |
Boom | Ray | Stellar I – Antares |  Stellar V – Fomalhaut | Stellar VI – Izar | Stellar V – Fomalhaut | Starlight | |
 Pole | Pole |  Stellar II – Algol | Stellar II – Algol | Stellar IX – Canopus | Stellar VII – Vega | Anything |
All The Skills You Need To Boost
- Ray
- Boom
- Pole
- Starlight
- Stellar I – Antares
- Stellar II – Algol
- Stellar V – Fomalhaut
- Stellar VI – Izar
- Stellar VII – Vega
- Stellar IX – Canopus
Remember, you cannot equip 2 nodes with the same 1st skill. So make sure the 1st skill in each node is different if you are going to make your own
Thunder Breaker
The perfect boost nodes for Thunder Breaker are,
| Thunder Breaker | Node # 1 | Node # 2 | Node # 3 | Node # 4 |
| 1st Skill |  Annihilate |  Thunderbolt |  Tidal Crash and Sea Wave |  Ascension |
Thunderbolt | Annihilate | Ascension | Tidal Crash and Sea Wave | |
 Gale & Typhoon | Gale & Typhoon |  Deep Rising | Deep Rising |
All The Skills You Need To Boost
- Annihilate
- Thunderbolt
- Gale and Typhoon
- Tidal Crash and Sea Wave
- Ascension
- Deep Rising
Remember, you cannot equip 2 nodes with the same 1st skill. So make sure the 1st skill in each node is different if you are going to make your own
Wild Hunter
The perfect boost nodes for Wild Hunter are,
| Wild Hunter | Node # 1 | Node # 2 | Node # 3 | Node # 4 | Node # 5 | Node # 6 |
| 1st Skill | Wild Arrow Blast/Wild Arrow Blast Type P |  Final Attack |  Exploding Arrows, Jaguar Rampage |  Swipe |  Hunting Assistant Unit |  Drill Salvo |
Final Attack | Wild Arrow Blast/Wild Arrow Blast Type P | Swipe | Exploding Arrows, Jaguar Rampage | Drill Salvo | Hunting Assistant Unit | |
 Summon Jaguar | Summon Jagua |  Sonic Roar/Jaguar Soul | Sonic Roar/Jaguar Soul |  Dash ‘n Slash/White Heat Rush | Dash ‘n Slash/White Heat Rush |
All The Skills You Need To Boost
 Wild Arrow Blast/Wild Arrow Blast Type P
- Final Attack
- Summon Jaguar
- Exploding Arrows, Jaguar Rampage
- Swipe
- Sonic Roar/Jaguar Soul
- Hunting Assistant Unit
- Drill Salvo
- Dash ‘n Slash/White Heat Rush
Remember, you cannot equip 2 nodes with the same 1st skill. So make sure the 1st skill in each node is different if you are going to make your own
Wind Archer
The perfect boost nodes for Wind Archer are,
| Wind Archer | Node # 1 | Node # 2 | Node # 3 | Node # 4 |
| 1st Skill |  Song of Heaven |  Trifling Wind |  Fairy Spiral |  Pinpoint Pierce |
Trifling Wind | Song of Heaven | Pinpoint Pierce | Fairy Spiral | |
 Storm Bringer | Storm Bringer |  Monsoon | Monsoon |
All The Skills You Need To Boost
- Song of Heaven
- Trifling Wind
- Storm Bringer
- Fairy Spiral
- Monsoon
- Pinpoint Pierce
Remember, you cannot equip 2 nodes with the same 1st skill. So make sure the 1st skill in each node is different if you are going to make your own
Xenon
The perfect boost nodes for Xenon are,
| Xenon | Node # 1 | Node # 2 | Node # 3 | Node # 4 |
| 1st Skill |  Mecha Purge |  Triangulation |  Orbital Cataclysm |  Beam Dance |
Triangulation | Mecha Purge | Beam Dance | Orbital Cataclysm | |
 Hypogram Field | Hypogram Field |  Salvo System | Salvo System |
All The Skills You Need To Boost
- Mecha Purge
- Triangulation
- Hypogram Field
- Orbital Cataclysm
- Beam Dance
- Salvo System
Remember, you cannot equip 2 nodes with the same 1st skill. So make sure the 1st skill in each node is different if you are going to make your own
Zero
The perfect boost nodes for Zero are,
| Zero | Node # 1 | Node # 2 | Node # 3 | Node # 4 | Node # 5 | Node # 6 | Node # 7 |
| 1st Skill |  Wind Cutter/Giga Crash |  Wind Striker/Falling Star |  Rolling Cross/Spin Driver |  Rolling Assault/Wheel Wind |  Piercing Thrust/Air Raid |  Moon Strike/Shadow Strike/Rising Slash |  Shadow Rain |
Wind Striker/Falling Star | Wind Cutter/Giga Crash | Rolling Assault/Wheel Wind | Rolling Cross/Spin Driver | Shadow Rain | Piercing Thrust/Air Raid |  Flash Assault/Flash Cut | |
 Storm Break/Groundbreaker | Storm Break/Groundbreaker |  Blade Ring/Throwing Weapon | Blade Ring/Throwing Weapon | Flash Assault/Flash Cut | Shadow Rain | Moon Strike/Shadow Strike/Rising Slash |
All The Skills You Need To Boost
- Wind Cutter/Giga Crash
- Wind Striker/Falling Star
- Storm Break/Groundbreaker
- Rolling Cross/Spin Driver
- Rolling Assault/Wheel Wind
- Blade Ring/Throwing Weapon
- Piercing Thrust/Air Raid
- Shadow Rain
- Flash Assault/Flash Cut
- Moon Strike/Shadow Strike/Rising Slash
Remember, you cannot equip 2 nodes with the same 1st skill. So make sure the 1st skill in each node is different if you are going to make your own